Azure AKS MachaOn
The Azure AKS MachaOn module provides a practical framework for deploying modular applications on Azure Kubernetes Service (AKS). It supports containerized RESTful services, integrates securely with systems like Commercetools, and enables scalable, cloud-ready deployments. Designed with modularity in mind, it helps developers streamline the process of building, testing, and deploying components for modern cloud environments.
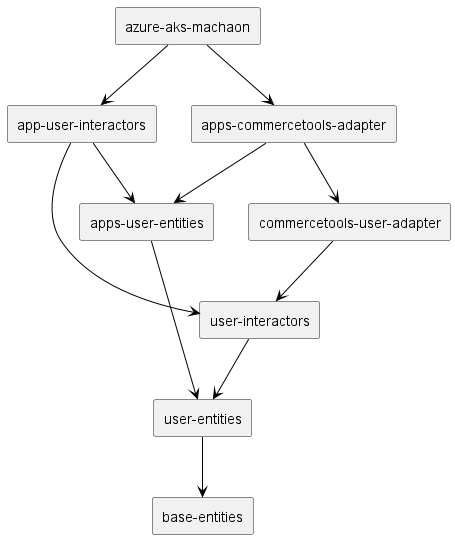
Dependency Graph
Below is the visual representation of project dependencies:
Code Repository
git svn clone https://svn.code.sf.net/p/macha/code/trunk/machaon/containers/azure/azure-aks-machaon
For detailed guidance on working with git-svn, visit: Prefer Working with Git? Use git-svn.
Prerequisites
- Azure Account: Ensure you have an active Azure account. Sign up at Azure Portal if you don't have one.
- Azure CLI: Install the Azure CLI tool. Azure CLI Installation Guide.
For these steps, you’ll manually create an AKS cluster in the Azure Portal, push a Docker image to DockerHub, deploy the application, and expose it via a service.
Log In to Azure
Log into Azure using the CLI:
az login
Follow the instructions and log in through the browser. After logging in, you can verify the active account and subscription:
az account list
Manually Create a Kubernetes Cluster on Azure Portal
Follow these steps:
-
Visit the Azure Portal: Azure Portal.
-
Search for “Azure Kubernetes Service (AKS)” in the search bar.
-
Click “Create” to provision a new AKS cluster.
- Resource Group: Choose an existing one or create a new one (e.g.,
macha-group). - Cluster Name: Provide a name (e.g.,
macha-cluster). - Region: Choose the Azure region (e.g.,
East US). - Node Size & Count: Choose an appropriate VM size for the nodes (e.g.,
Standard_DS2_v2with 3 nodes).
- Resource Group: Choose an existing one or create a new one (e.g.,
-
Skip optional settings unless needed and click “Review + Create”.
-
Click “Create”, and wait for the cluster to be provisioned.
Get AKS Credentials
Once the cluster is created, retrieve the kubeconfig credentials for your AKS cluster:
az aks get-credentials --resource-group macha-group --name macha-cluster
This integrates your AKS cluster with your local ~/.kube/config file, enabling kubectl commands to interact with the cluster.
To verify that the credentials are working:
kubectl get nodes
If the AKS nodes are operational, you'll see a list similar to:
NAME                                STATUS   ROLES   AGE     VERSION
aks-nodepool1-xxxxxx-vmss000000     Ready    agent   3m      v1.24.9
aks-nodepool1-xxxxxx-vmss000001     Ready    agent   3m      v1.24.9
aks-nodepool1-xxxxxx-vmss000002     Ready    agent   3m      v1.24.9
Build and Push Docker Image to DockerHub
Ensure you have Docker Buildx installed. If not, follow the Docker Buildx installation guide.
Build Your Docker Image
Build a multi-platform Docker image (for linux/amd64 and linux/arm64) and push it to DockerHub.
Replace <image-tag> with your actual DockerHub username and image tag.
Command:
docker buildx build --no-cache --platform linux/amd64,linux/arm64 -t machanism/macha-azure-aks-app:0.0.1.5 --push .
Here’s what this command does:
--no-cache: Ensures the image is built without using cached layers.--platform linux/amd64,linux/arm64: Builds a multi-architecture image.-t machanism/macha-azure-aks-app:0.0.1.5: Tags the image.--push: Pushes the image to DockerHub after building.
Secret Configuration
You should create k8s\secret.yaml with Base64 encoded commercetools secret key:
apiVersion: v1
kind: Secret
metadata:
  name: macha-secrets
type: Opaque
data:
  CTP_SECRET_KEY: XXXXXXXXXXXXXXXXXXXXXXXXXXXX # Base64 encoded value of your secret
and apply to AKS:
kubectl apply -f secret.yaml
Deploy the Image to the AKS Cluster
Create a deployment.yaml file to define your Kubernetes deployment.
Example deployment.yaml
apiVersion: apps/v1
kind: Deployment
metadata:
  name: macha-azure-aks-app
spec:
  replicas: 2
  selector:
    matchLabels:
      app: macha-azure-aks-app
  template:
    metadata:
      labels:
        app: macha-azure-aks-app
    spec:
      containers:
        - name: macha-app
          image: machanism/macha-azure-aks-app:0.0.1.5 # Your DockerHub image
          ports:
            - containerPort: 3000
Apply the deployment configuration:
kubectl apply -f deployment.yaml
Verify the deployment:
kubectl get deployments
kubectl get pods
You should see the pods running successfully.
Create a Service to Expose the Application
Example service.yaml
Create a service.yaml file to define a LoadBalancer Kubernetes service that exposes your application to the internet:
apiVersion: v1
kind: Service
metadata:
  name: macha-azure-aks-service
spec:
  selector:
    app: macha-azure-aks-app
  ports:
    - protocol: TCP
      port: 80          # Port exposed externally
      targetPort: 3000  # Port within the container
  type: LoadBalancer
Apply the service configuration:
kubectl apply -f service.yaml
Get Public IP Address for the Service
Check the Service to get the public IP address assigned by Azure Load Balancer:
kubectl get svc
Example output:
NAME                     TYPE           CLUSTER-IP     EXTERNAL-IP     PORT(S)        AGE
macha-azure-aks-service  LoadBalancer   10.0.125.78    20.30.40.50     80:30379/TCP   2m
Here:
-
EXTERNAL-IP:20.30.40.50is your application's public IP. Access your REST API via:http://20.30.40.50
Check Logs and Debug Pods
If you need to debug or verify logs for your pods:
-
List Pods:
kubectl get pods -
View Logs for a Specific Pod: Replace
<pod_name>with the name of your pod:kubectl logs <pod_name>
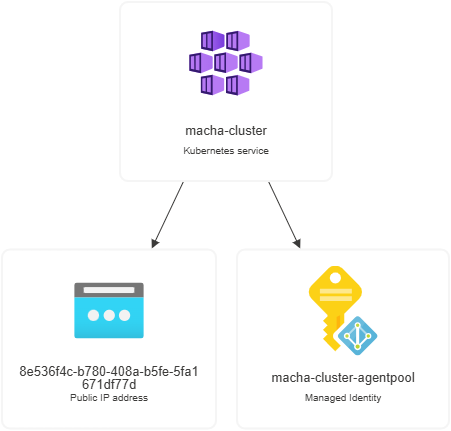
Resource Diagram
Summary of Commands
-
Log in to Azure:
az login -
Connect to AKS Cluster:
az aks get-credentials --resource-group macha-group --name macha-cluster -
Build and Push Docker Image:
docker buildx build --no-cache --platform linux/amd64,linux/arm64 -t machanism/macha-azure-aks-app:0.0.1.5 --push . -
Deploy Application:
kubectl apply -f deployment.yaml -
Expose Service:
kubectl apply -f service.yaml -
Get Public IP:
kubectl get svc -
Check Logs and Debug:
kubectl get pods
kubectl logs <pod_name>
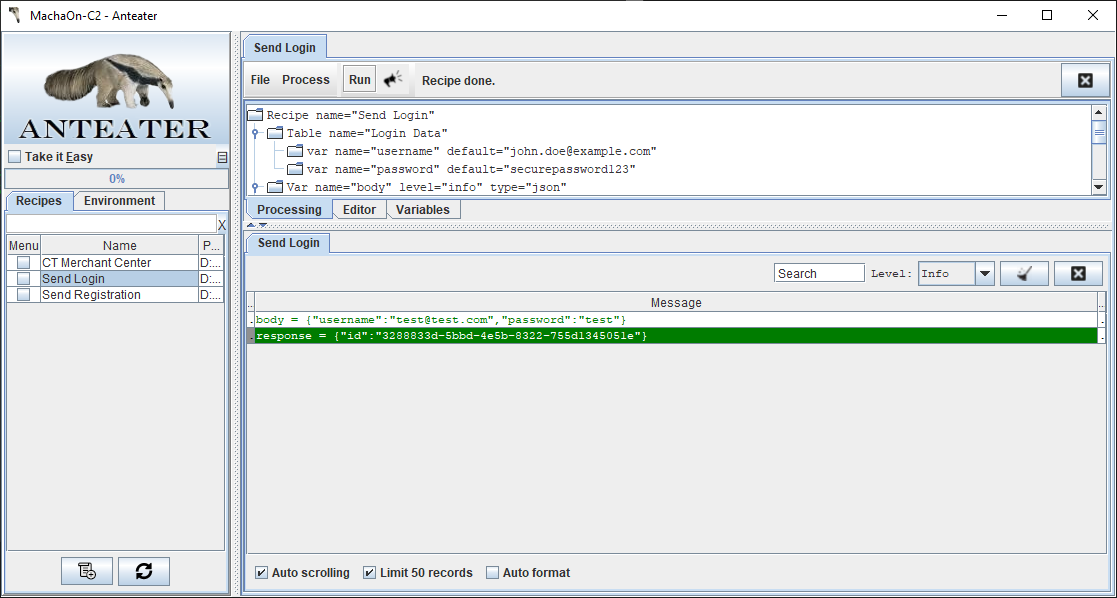
Test
mvn ae:run -Drecipes="Send Login"