MachaOn-SL-OCI-1 Backend
This project demonstrates the setup and deployment of an Oracle Cloud Infrastructure (OCI) Function as part of the MachaOn-SL-OCI-1 Backend system. The guide walks through steps to prepare the environment, create Docker images, deploy OCI Functions, and test their functionality.
Project Structure
The structure of MachaOn-SL-OCI-1 is built to maintain modularity, readability, and ease of integration. The following breakdown highlights its key components:

Preparing Your Environment
Before proceeding, ensure you have the necessary tools and resources installed:
- OCI CLI installed and configured.
- Docker installed and running (Get Docker Here).
- An authenticated access to OCI for managing functions, Docker images, and registry.
Authenticate OCI CLI
OCI CLI requires authentication to interact with Oracle Cloud services. Run the following command to authenticate your session:
oci session authenticate
This will open your browser to log in to your OCI account and verify credentials.
For more information, refer to the OCI CLI Quickstart Guide1.
Creating a Docker Image
OCI Functions package and deploy code as Docker images. Below are the steps to prepare and push the Docker image.
Login to OCI Container Registry (OCIR)
OCI requires Docker to authenticate before pushing images to the Oracle Container Registry.2
Run the following commands to log in to your Container Registry (OCIR):
docker login -u '<tenancy-namespace>/<username>' <region-key>.ocir.io
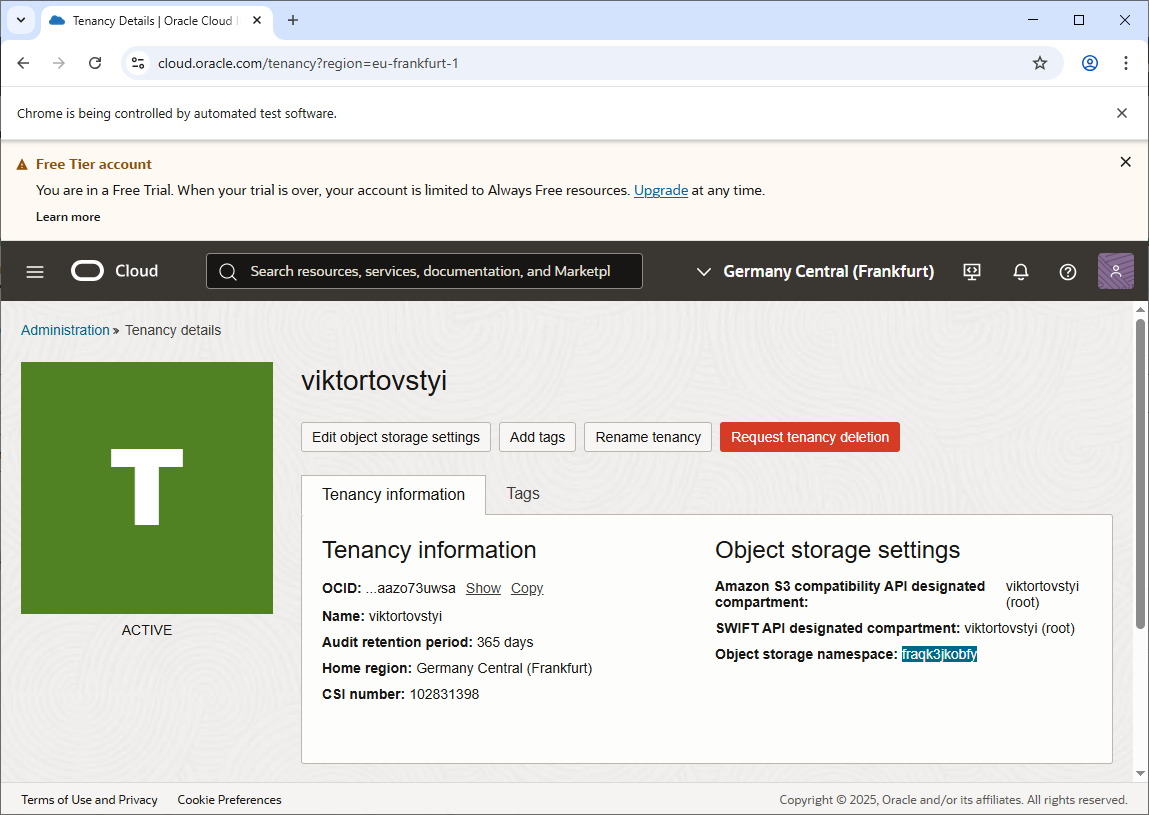
Note tenancy-namespace you can find on tenancy page, see an example bellow:
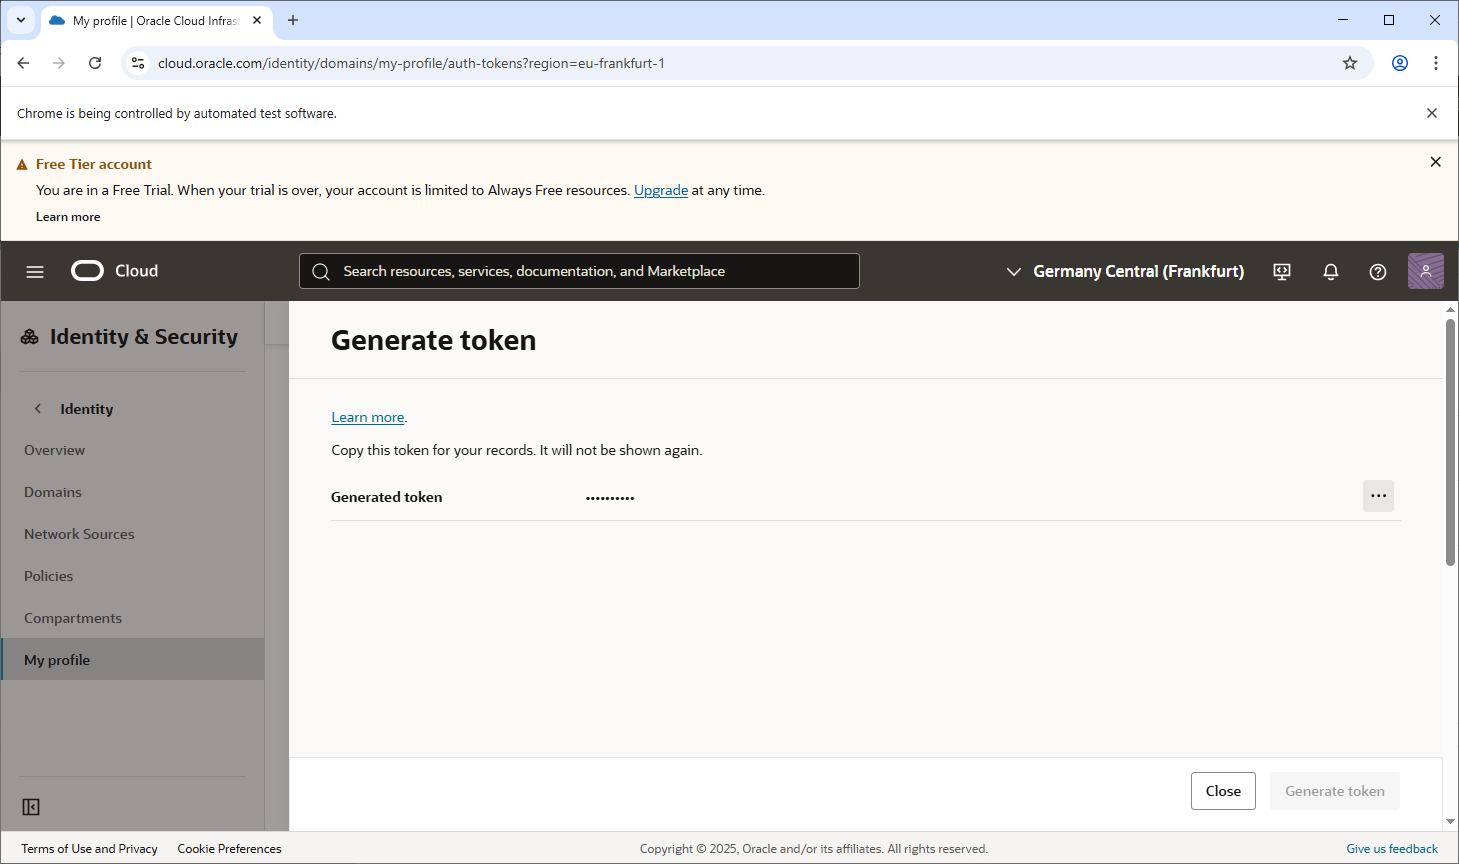
For registry login you can use the token4.
Example: Logging into the Frankfurt region:
docker login eu-frankfurt-1.ocir.io -u "fraqk3jkobfy/<email_address>" -p <Auth token>
Build Docker Image
We are using a custom Docker image, so a Dockerfile was created, and func.yaml3 was configured accordingly.
To build the Docker image for the project, we rely on the settings.xml Maven configuration file. This file contains the necessary settings for fetching the project's dependencies, including components from the snapshot repository.
The snapshot repository is essential for projects using non-release (snapshot) versions, as it enables the build process to fetch the latest changes and ensures that all required artifacts are pulled from the correct repository. This setup is particularly important for Machanism projects, which are designed to use components exclusively from the artifact repository rather than local or predefined libraries.
<settings xmlns="http://maven.apache.org/SETTINGS/1.2.0" xmlns:xsi="http://www.w3.org/2001/XMLSchema-instance"
	xsi:schemaLocation="http://maven.apache.org/SETTINGS/1.2.0 http://maven.apache.org/xsd/settings-1.2.0.xsd">
	<profiles>
		<profile>
			<activation>
				<activeByDefault>true</activeByDefault>
			</activation>
			<repositories>
				<repository>
					<name>Central Portal Snapshots</name>
					<id>central-portal-snapshots</id>
					<url>https://central.sonatype.com/repository/maven-snapshots/</url>
					<releases>
						<enabled>false</enabled>
					</releases>
					<snapshots>
						<enabled>true</enabled>
					</snapshots>
				</repository>
				<repository>
					<id>confluent</id>
					<url>https://packages.confluent.io/maven/</url>
				</repository>
			</repositories>
		</profile>
	</profiles>
</settings>
Build your project locally before proceeding with Docker image creation.
You can use Fn Project to build the image with the following command:
fn build
Alternatively, you can build the Docker image directly using the docker build command:
- Authenticate with the container registry.
- Navigate to your function's directory (where the
Dockerfileis located). - Build the image using the following syntax:
docker build -t <region-key>.ocir.io/<tenancy-namespace>/<repository-name>:<tag> .
Example:
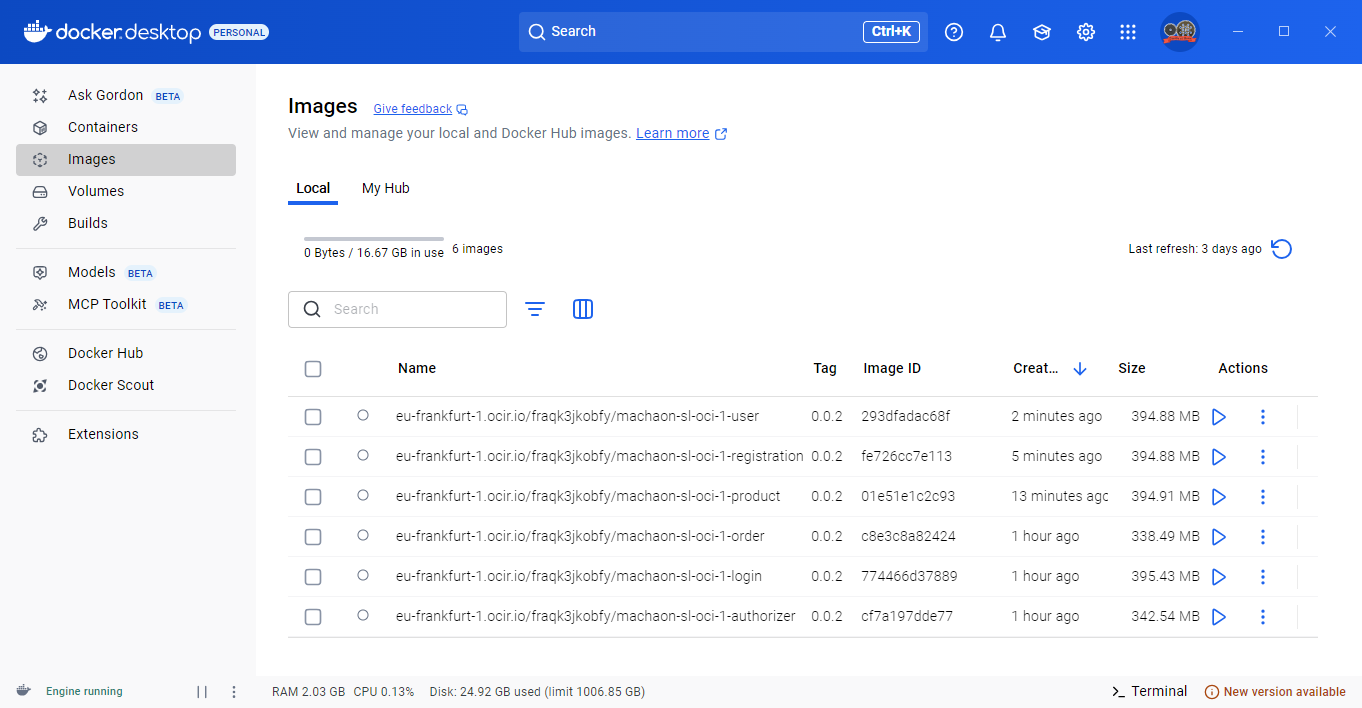
docker build -t eu-frankfurt-1.ocir.io/fraqk3jkobfy/machaon-sl-oci-1-user:0.0.1 .
Push Docker Image to OCIR
After building the Docker image, the next step is to push it to the OCI Container Registry (OCIR), where it can be stored and later deployed. Pushing the image allows it to become available for use by other developers or as part of an automated deployment pipeline.
You can push the image to OCIR using the docker push command:
docker push <region-key>.ocir.io/<tenancy-namespace>/<repository-name>:<tag>
Example:
docker push eu-frankfurt-1.ocir.io/fraqk3jkobfy/machaon-sl-oci-1-user:0.0.1
Alternatively, if you are using FN Project, you can skip the separate docker push step and use the fn deploy command, which both pushes the image and deploys the function:
fn deploy --app <application-name> --registry <region-key>.ocir.io/<tenancy-namespace>
- Replace
<application-name>with the name of your function application in OCI. - Replace
<region-key>,<tenancy-namespace>, and<repository-name>with your OCI-specific values.
Create Application
OCI Applications act as containers for functions in Oracle Cloud Infrastructure Functions service. Before deploying a function, you need to create an Application where the function resides. Applications define resources like networking and logging configurations necessary for functions to execute.
Below is a short guide on creating an Application via both the OCI Console and OCI CLI:
Create Application Using OCI Console
-
Log in to OCI Console:
- Navigate to Oracle Cloud Console.
-
Access the Functions Service:
- Open the left-hand menu, go to Developer Services > Functions.
-
Select the Compartment:
- Use the Compartment Selector to choose the compartment where you want to create the application.
-
Create the Application:
- Click Create Application.
- Fill in the following details:
- Name: Enter a unique name for the application (e.g.,
my-app). - VCN Subnet: Select a Subnet in the Virtual Cloud Network (VCN) where the application will run.
- Logging: Optionally enable logging to send function logs to an OCI Log Group.
- Name: Enter a unique name for the application (e.g.,
-
Confirm:
- Click Create. Your application will now appear in the Applications List.
Create Application Using OCI CLI
You can use the following CLI command to create an OCI Functions Application.
Command:
oci fn application create \
  --compartment-id <compartment-ocid> \
  --display-name <application-name> \
  --subnet-id <subnet-ocid>
Parameters:
--compartment-id: The OCID of the compartment where the application will be created.--display-name: A friendly name for the application (e.g.,my-app).--subnet-id: The OCID of the subnet in your Virtual Cloud Network (VCN). Functions use this subnet for networking.
Example:
oci fn application create \
  --compartment-id ocid1.compartment.oc1..exampleuniqueID \
  --display-name my-app \
  --subnet-id ocid1.subnet.oc1.iad.exampleuniqueSubnetID
Set Environment Variables
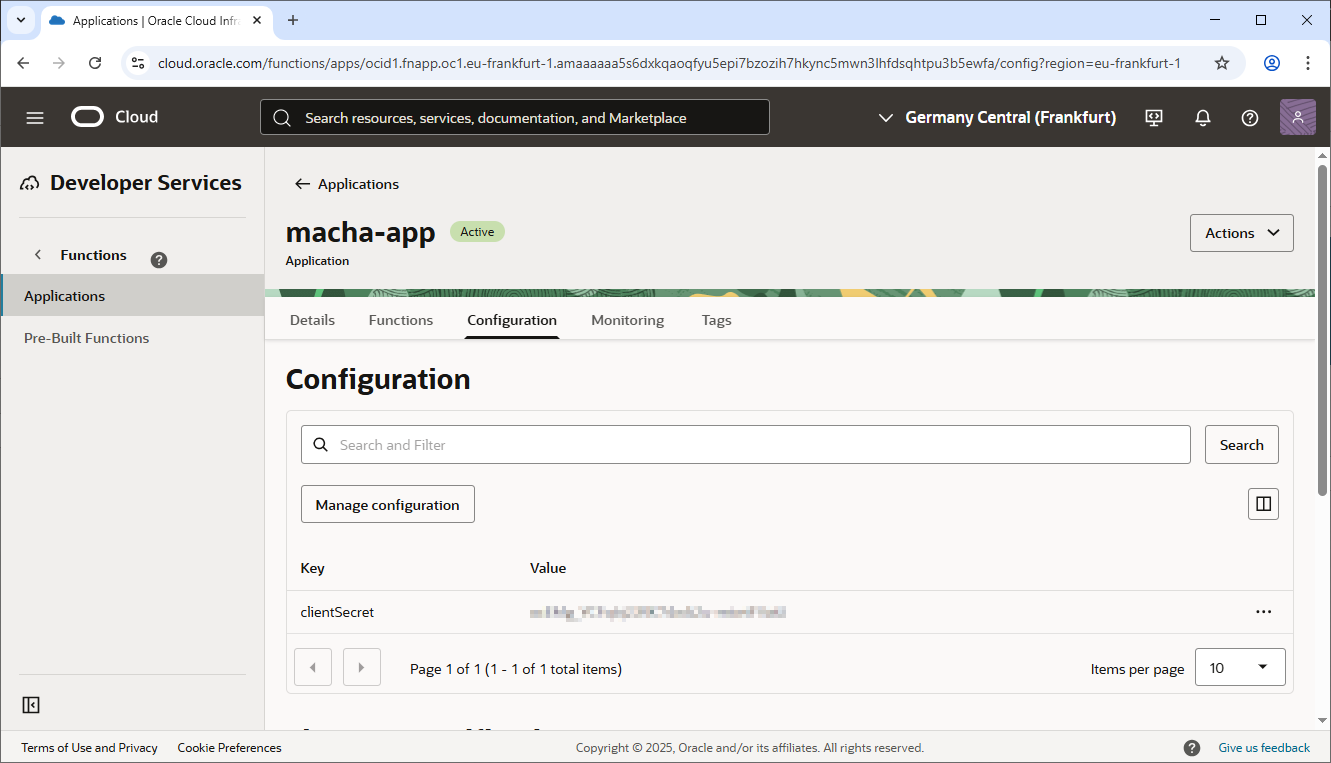
Environment variables are used to configure OCI Functions and provide runtime configurations, such as credentials, API keys, or any other secret values the function requires. For this particular OCI function, which integrates with Commercetools, you need to set a specific configuration value: clientSecret. This value is required by the function to authenticate and interact with the Commercetools API.
Before creating the function, you must configure the clientSecret as an environment variable. OCI supports environment variables for passing sensitive configuration settings securely to your function.
Environment variables are set per function, and they are stored securely in OCI (encrypted at rest and in transit). These values are accessible to the function during execution but are not exposed in function code or logs.
By properly configuring the clientSecret and any other required environment variables before creating the function, you ensure that the function can securely integrate with the Commercetools API and comply with best practices around sensitive data handling.
Setting Environment Variables
-
Navigate to OCI Functions:
- Open the OCI Console.
- Go to Developer Services > Functions.
-
Select an Application:
- Choose the Application where you plan to create the function.
-
Create the Function:
- When creating the function, scroll down to the Configuration section.
- Click Add Environment Variable.
-
Add Configuration:
- Key: Enter
clientSecret. - Value: Enter the value for the secret. (E.g.,
abcdef12345).
Repeat this step to add additional environment variables if needed.
- Key: Enter
-
Save or Create:
- Finalize the creation of the function. The environment variable will be securely saved and available when the function executes.
You can also set environment variables directly when creating the function using the --config flag.
oci fn function create \
  --application-id <application-id> \
  --display-name <function-name> \
  --image <image-ocir-path> \
  --memory-in-mbs 128 \
  --config '{"clientSecret":"abcdef12345"}'
--config: Pass a JSON-formatted dictionary of key-value pairs for environment variables.clientSecret: Replace with the actual secret value provided by Commercetools.
Example:
oci fn function create \
  --application-id ocid1.fnapp.oc1.iad.exampleappid \
  --display-name commercetools-function \
  --image iad.ocir.io/my-namespace/commercetools-function:1.0.0 \
  --memory-in-mbs 128 \
  --config '{"clientSecret":"my-commercetools-client-secret"}'
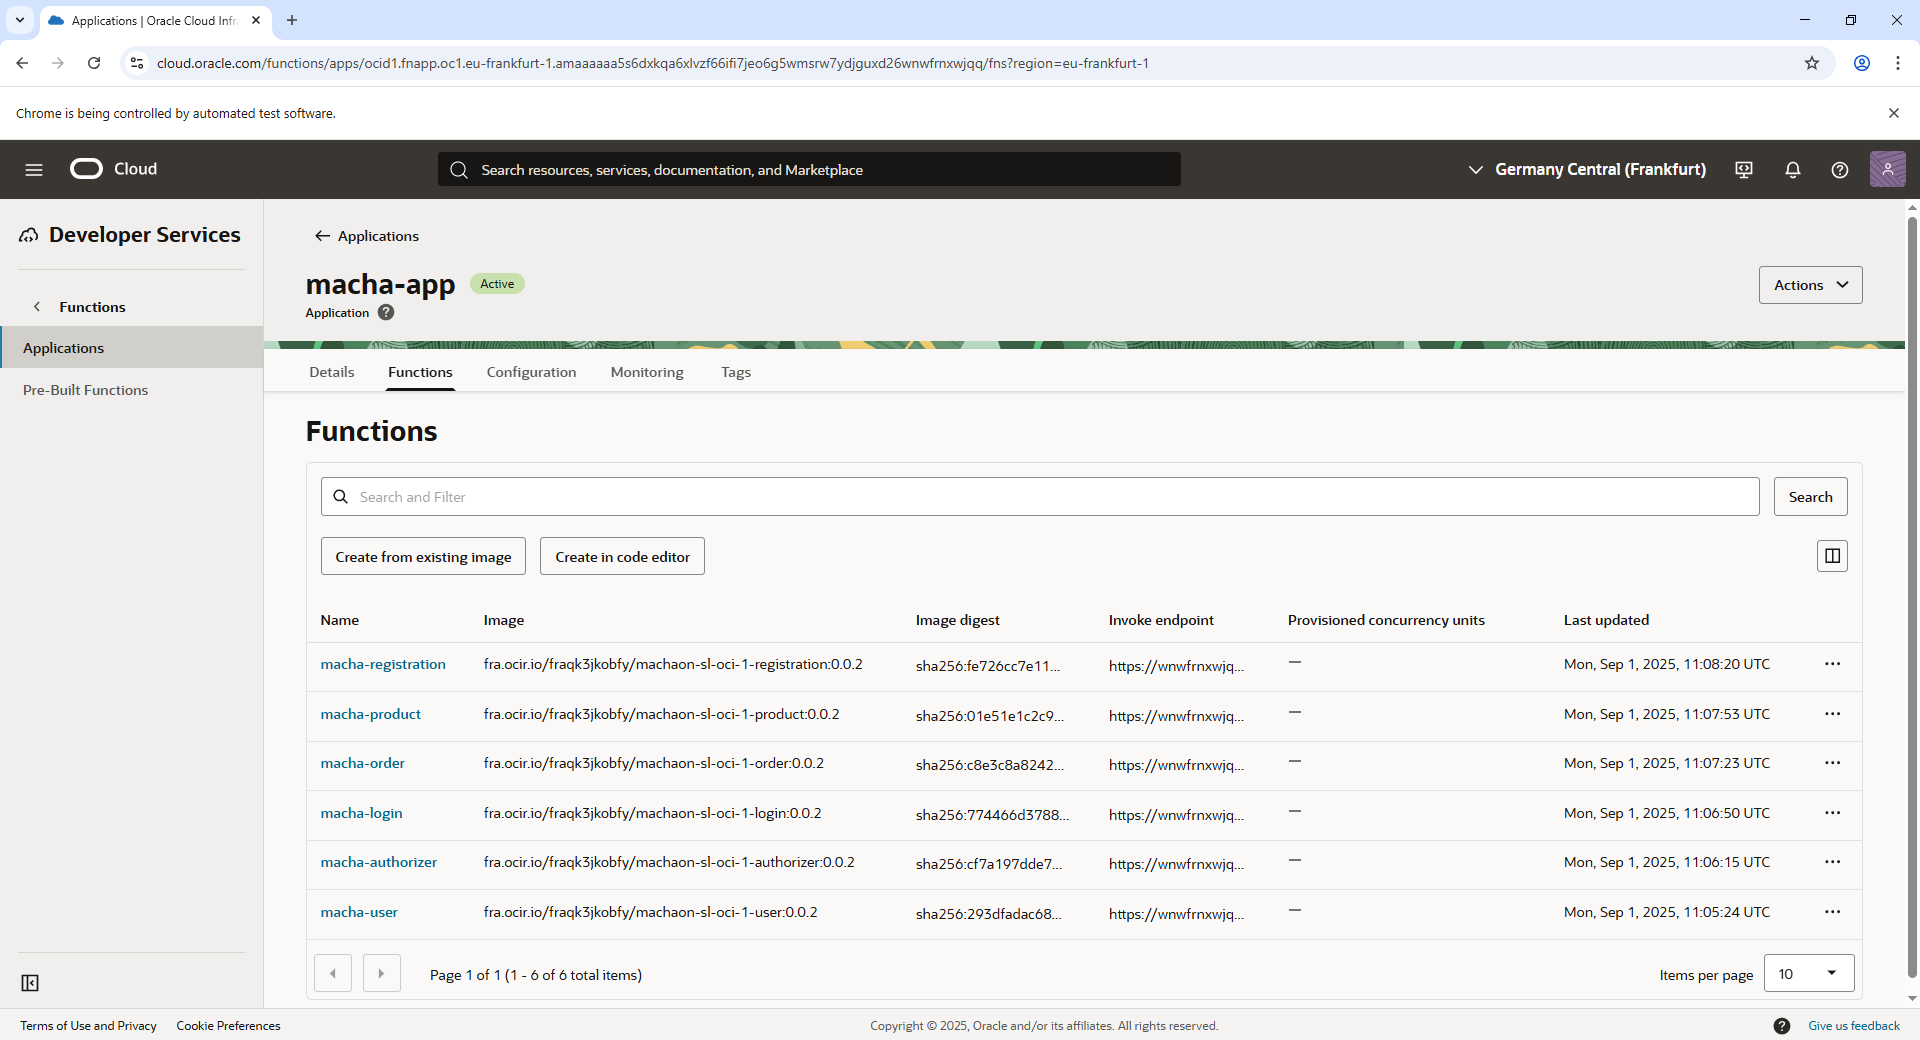
Create OCI Function
OCI Functions are deployed as part of an Application in Oracle Functions service. Follow these steps to create the function:
Set OCI CLI Authentication
In case the OCI_CLI_AUTH is not set, execute the following to authenticate using a security token:
set OCI_CLI_AUTH=security_token
Deploy the Function
Using the oci fn command, create the function by referencing the Application ID and the Docker Image:
oci fn function create \
  --application-id <application-id> \
  --display-name <function-name> \
  --image <docker-image-full-path> \
  --memory-in-mbs <memory-size>
Example:
oci fn function create \
  --application-id ocid1.fnapp.oc1.eu-frankfurt-1.amaaaaaa5s6dxkqaoqfyu5epi7bzozih7hkync5mwn3lhfdsqhtpu3b5ewfa \
  --display-name macha-user \
  --image eu-frankfurt-1.ocir.io/fraqk3jkobfy/machaon-sl-oci-1-user:0.0.1 \
  --memory-in-mbs 128
Sample Output:
{
  "data": {
    "application-id": "ocid1.fnapp.oc1.eu-frankfurt-1.amaaaaaa5s6dxkqaoqfyu5epi7bzozih7hkync5mwn3lhfdsqhtpu3b5ewfa",
    "display-name": "macha-user",
    "id": "ocid1.fnfunc.oc1.eu-frankfurt-1.amaaaaaa5s6dxkqabc27lwfpnzynz5kt6czdelgnzhjwgf5q55wsdca6uxxa",
    "image": "eu-frankfurt-1.ocir.io/fraqk3jkobfy/machaon-sl-oci-1-user:0.0.1",
    "invoke-endpoint": "https://htpu3b5ewfa.eu-frankfurt-1.functions.oci.oraclecloud.com",
    "lifecycle-state": "ACTIVE",
    "memory-in-mbs": 128,
    "timeout-in-seconds": 30
  }
}
To understand how OCI Functions are conceptualized, refer to OCI Functions Concepts3.
Invoke OCI Function
After deploying the function, you can invoke it directly using the oci fn function invoke command:
Invoke Example
Run the following command:
oci fn function invoke --function-id <function-ocid> --body "<payload>" --file <output-file>
Example:
oci fn function invoke --function-id ocid1.fnfunc.oc1.eu-frankfurt-1.amaaaaaa5s6dxkqabc27lwfpnzynz5kt6czdelgnzhjwgf5q55wsdca6uxxa --body "3288833d-5bbd-4e5b-8322-755d1345051e" --file "-"
The output will be output to STDOUT. For example:
{
  "country": "US",
  "profile": {
    "email": "[email protected]",
    "firstName": "",
    "lastName": ""
  },
  "userId": {
    "id": "3288833d-5bbd-4e5b-8322-755d1345051e"
  },
  "username": "[email protected]"
}
For more on invoking OCI Functions, check Invoking Functions4.
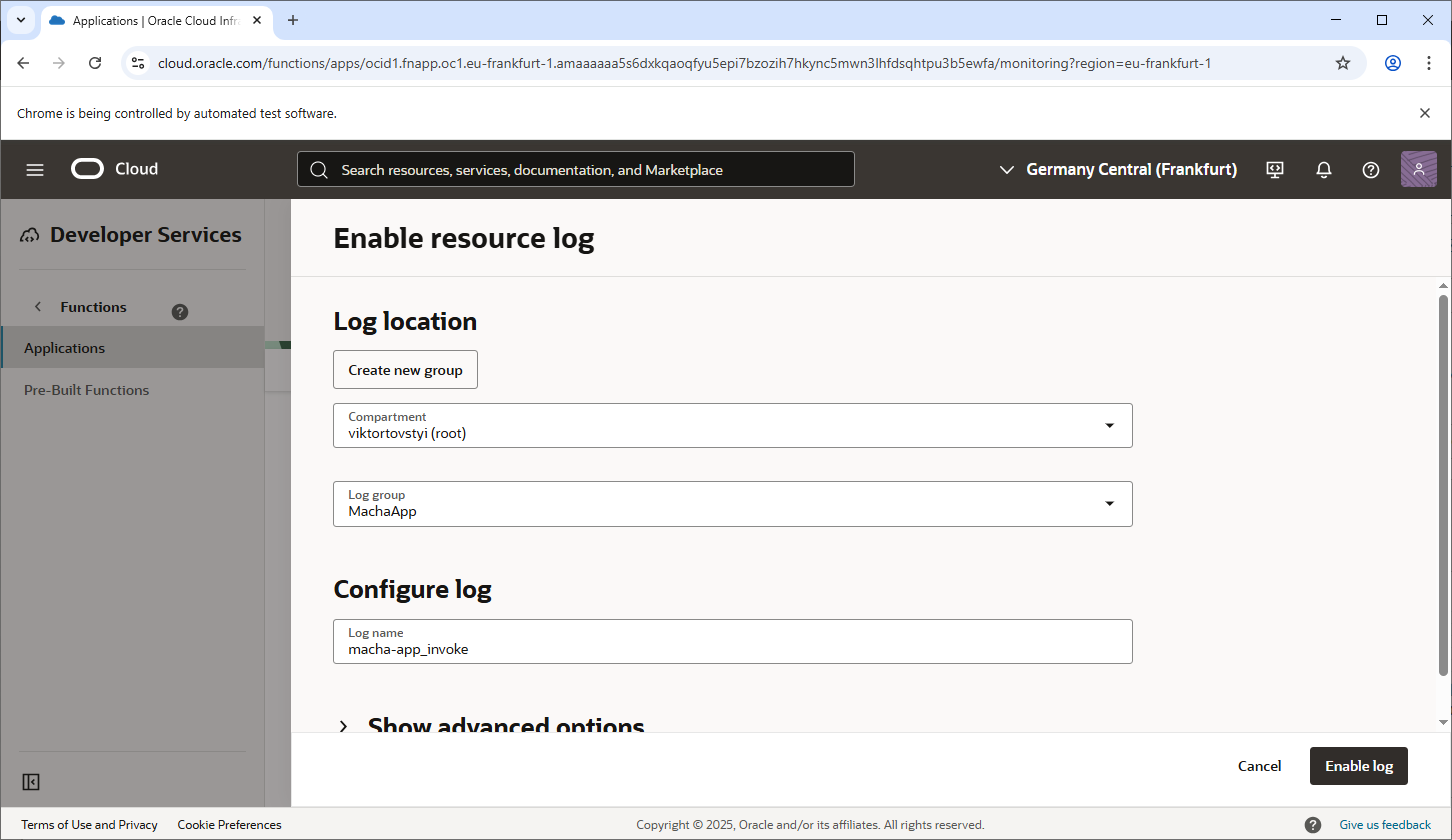
Logging
Logging is an essential part of managing and debugging OCI Functions. Enabling and accessing function logs allows you to monitor the behavior of your functions by capturing standard output (stdout) and standard error (stderr) during their execution. OCI integrates with the OCI Logging service to store and manage these logs.5
Enabling Function Logging in the OCI Console
To use the OCI Logging service to collect and view logs from a function, you need to enable logging for the OCI Function Application. Here’s how you can do it via the OCI Console:
Step 1: Navigate to the Function Application
- Log in to the OCI Console.
- In the navigation menu, go to Developer Services > Functions.
- Select the Application associated with the function for which you want to enable logging.
Step 2: Enable Logging
-
On the Function Application details page:
- Look for the Logging section.
- If not enabled, you will see an option to Enable Logging.
-
Click Enable Logging:
- You will be prompted to enable logging for the application.
- Specify the Log Group where the function logs will be sent.
- Specify a Log Name for the logs (e.g.,
function-log).
-
Once enabled, the logs for all functions in this application will be written to the specified log group and log name.
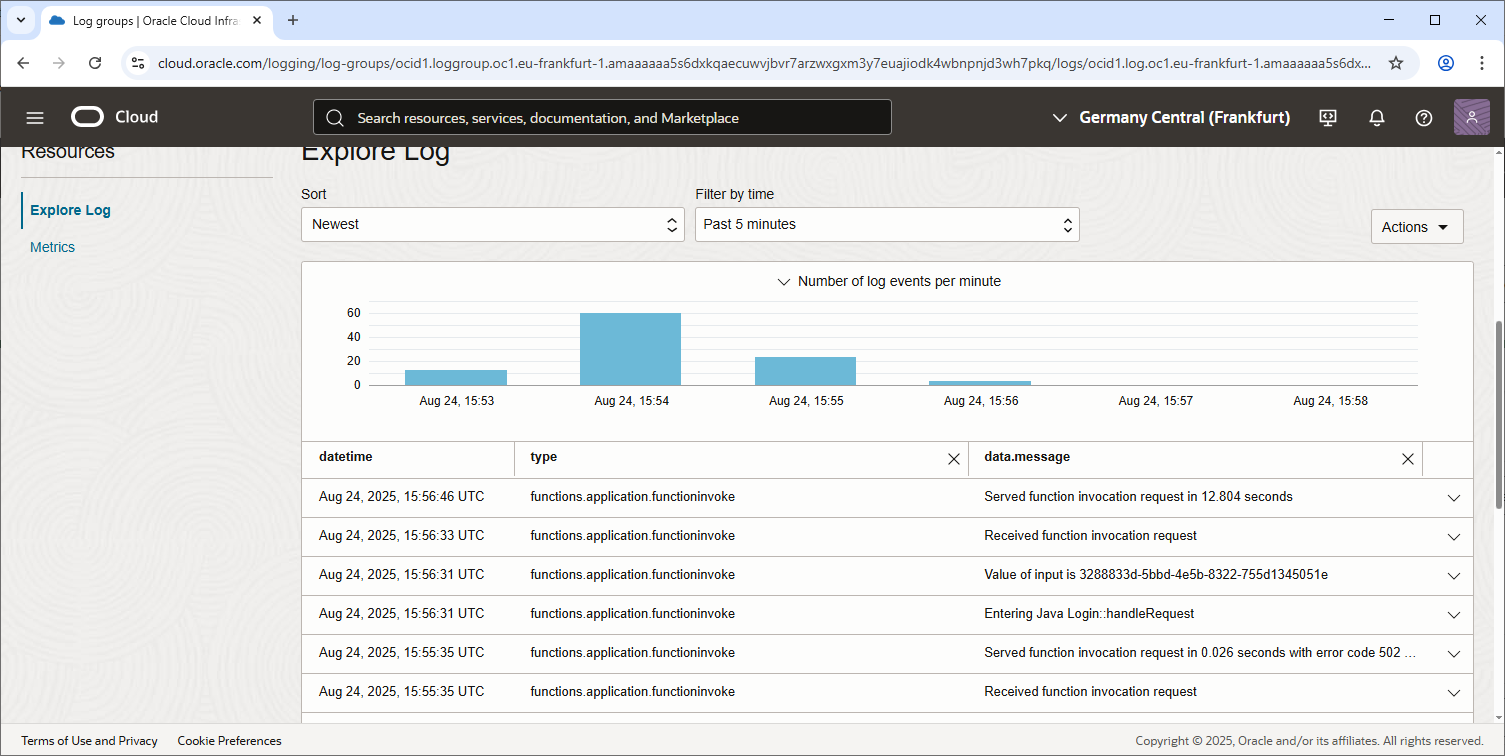
Viewing Function Logs
Once logging is enabled, you can access logs through the OCI Logging service. Here’s how to view your function logs:
Step 1: Navigate to the Associated Log Group
- Open the OCI Console.
- In the navigation menu, go to Observability & Management > Logging > Log Groups.
- Select the Log Group specified during logging configuration for the Function Application.
Step 2: View the Function Logs
- Inside the Log Group, locate the Log Name selected during the logging setup (e.g.,
function-log). - Click the log name to open it.
- Use the OCI Logs Viewer to view logs:
- Logs are displayed with a timestamp and corresponding messages from the function.
- All output from
stdoutandstderrduring function execution is captured here.
Step 3: Search and Filter Logs
- Use the built-in search and query capabilities in the Logs Viewer to filter and analyze logs:
- For example, search for specific keywords related to errors, debugging output, or any custom log entries your function generates.
- You can also use the Structured Search feature to focus on specific fields in the logs.
You can disable logging at the Application level to stop the collection of logs:
- Navigate to the Function Application’s logging section in the OCI Console.
- Click Disable Logging.
Monitoring Cost
Since logs are stored in the OCI Logging service, enabling logging may incur storage and retrieval costs. It’s advisable to review the Logging Service Pricing in the OCI Documentation.
Notes
- Always ensure proper permissions are configured for OCI Functions involving IAM Policies for
manage functions-family,read repos, anduse virtual-network-familyin the required compartment. - Ensure networking is appropriately configured with access to the Internet Gateway or NAT Gateway if resources require external connectivity.