MachaOn-SL-OCI-1 Frontend
Introduction
The MachaOn-SL-OCI-1 Frontend is a tailored implementation of the UI Adapter, built upon the robust Machb Front project libraries. These libraries serve as the foundation for creating a scalable and customizable user interface.
This frontend has been specifically customized to meet the special requirements of the MachaOn-SL-OCI-1 project, ensuring seamless interaction between the following components:
- Frontend UI: Delivering an intuitive and responsive user experience.
- JWT Authentication: Securing user access using JSON Web Tokens.
The integration of these technologies enables a highly modular and secure frontend solution tailored for modern web applications.
Getting Started
Clone MachaOn-SL-OCI-1 Frontend project:
git svn clone https://svn.code.sf.net/p/macha/code/trunk/machaon/faas/oci/machaon-sl-oci-1/frontend machaon-sl-oci-1-frontend
cd machaon-sl-oci-1-frontend
For detailed guidance on working with git-svn, visit: Prefer Working with Git? Use git-svn.
Build
Before running the build commands, ensure that Node.js is installed on your system. Machanism projects typically require a specific version of Node.js for compatibility purposes.
Node.js Installation Requirements
- Recommended Version: Use Node.js v22.18.0 or a compatible version. Older versions may cause compatibility issues.
- Installation Options:
- Download: Visit Node.js and download the appropriate installer for your operating system.
- Package Managers:
- Windows: Use Chocolatey (
choco install nodejs). - macOS: Use Homebrew (
brew install node). - Linux: Use your distribution's package manager (e.g.,
apt install nodejsfor Ubuntu).
- Windows: Use Chocolatey (
Verify your installation:
node -v
Build Commands
Once Node.js is installed, proceed with the following commands:
npm install
npm run build
npm install: Installs project dependencies specified in thepackage.jsonfile.npm run build: Builds the project for production use.
Local Run for Testing
To test the application locally, use the command:
npm run serve
npm run serve: Starts a local development server, allowing you to test changes in a live environment.
Ensure all dependencies are properly installed before running the local server.
Static Website Hosting Configuration
This section briefly outlines the process of configuring OCI Object Storage and Oracle API Gateway to host a static website. The setup includes storing your static files securely in Object Storage and providing public access via an HTTPS endpoint using API Gateway.1
Upload Static Website Files
To host your static website on Oracle Cloud Infrastructure (OCI Object Storage), follow these steps:
-
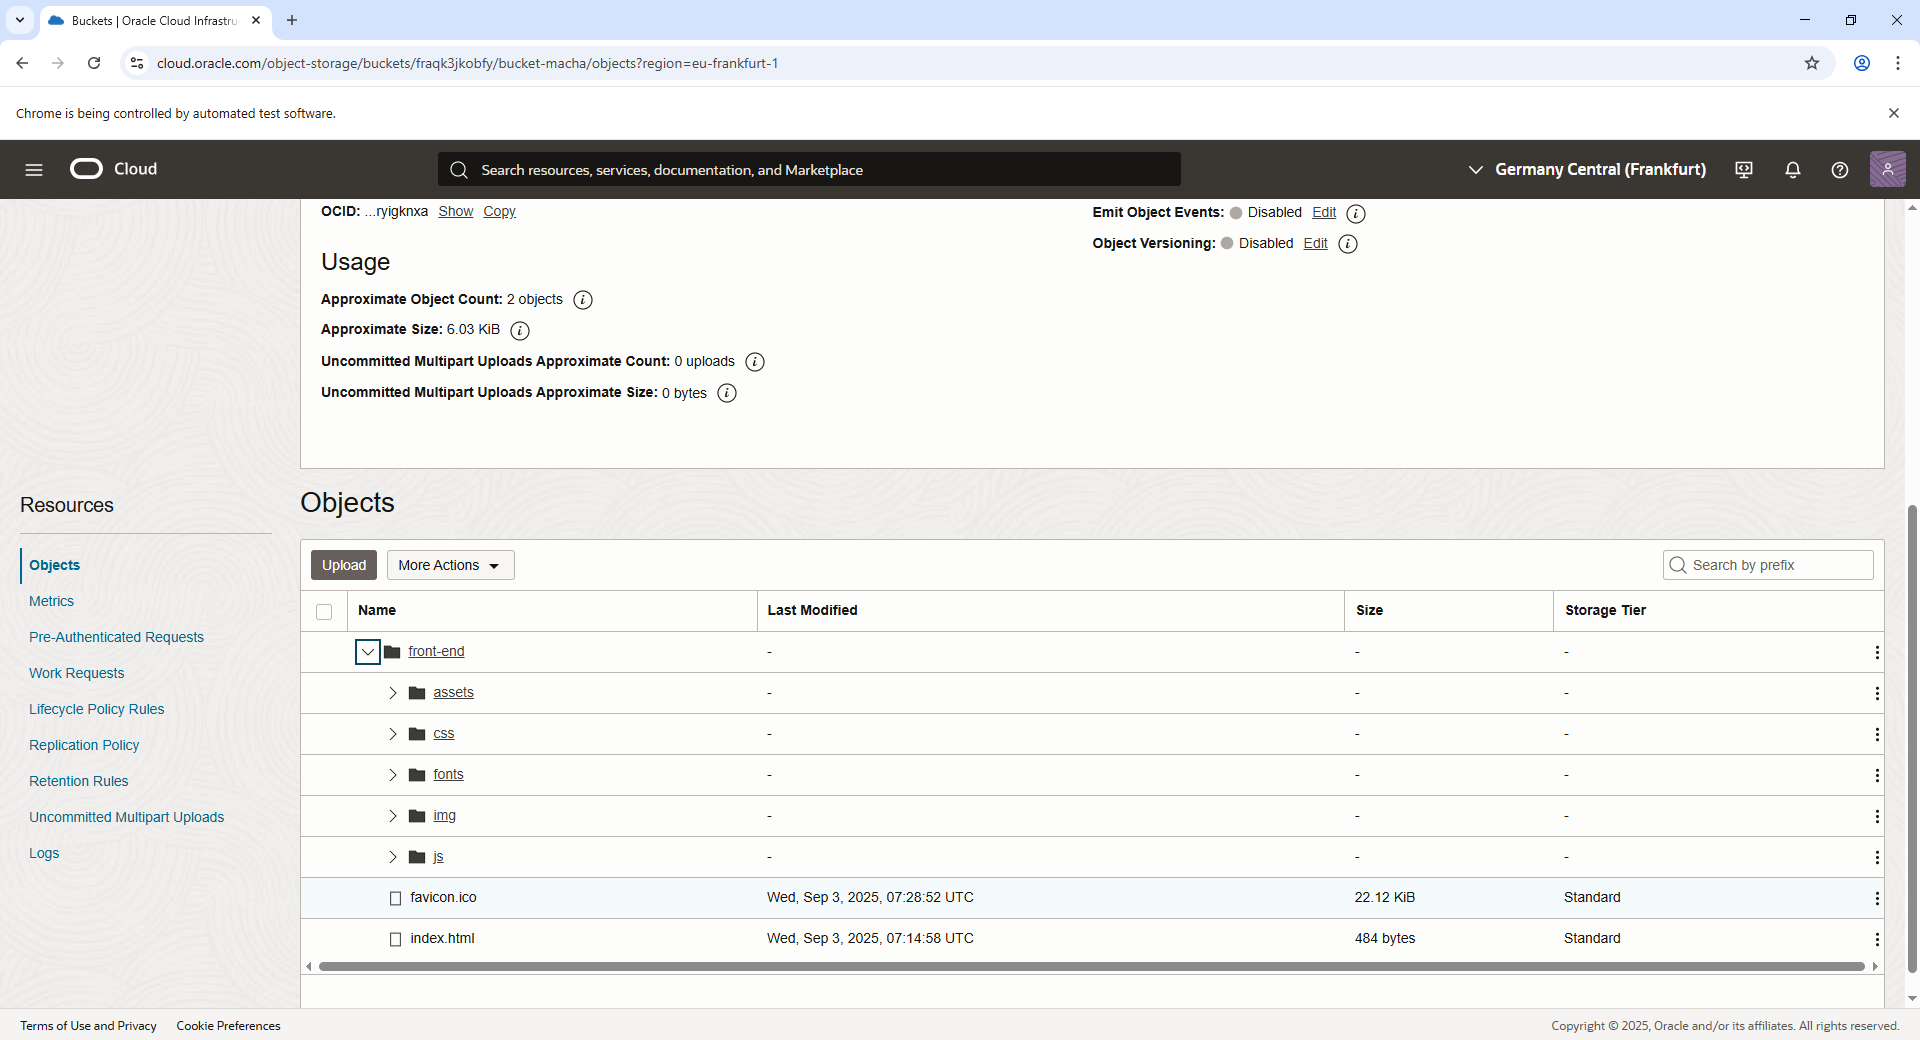
Create an Object Storage Bucket:
- Navigate to the OCI Console, and create a new Object Storage bucket.
- Set the bucket to private access to ensure security. The contents will later be accessed through the API Gateway.
-
Upload Website Root Files:
- Upload the key website files, such as
index.htmlandfavicon.ico, to the appropriate paths in your bucket.
- Upload the key website files, such as
-
Bulk Upload Website Folders:
- Upload directories such as
css,js,fonts, and other static asset folders to the bucket to enable proper rendering of your website.
- Upload directories such as
-
Command-Line Example for Uploading Files:
Use the following commands with the OCI CLI to upload your files and directories:oci os object put --bucket-name bucket-macha --namespace fraqk3jkobfy --file ./dist/index.html --name front-end/index.html --content-type text/html --force oci os object put --bucket-name bucket-macha --namespace fraqk3jkobfy --file ./dist/favicon.ico --name front-end/favicon.ico --content-type image/x-icon --force oci os object bulk-upload --bucket-name bucket-macha --namespace fraqk3jkobfy --prefix front-end/js/ --src-dir ./dist/js --content-type "application/javascript" --overwrite oci os object bulk-upload --bucket-name bucket-macha --namespace fraqk3jkobfy --prefix front-end/css/ --src-dir ./dist/css --content-type "text/css" --overwrite oci os object bulk-upload --bucket-name bucket-macha --namespace fraqk3jkobfy --prefix front-end/fonts/ --src-dir ./dist/fonts --content-type "font/*" --overwrite oci os object bulk-upload --bucket-name bucket-macha --namespace fraqk3jkobfy --prefix front-end/img/ --src-dir ./dist/img --content-type "image/*" --overwrite oci os object bulk-upload --bucket-name bucket-macha --namespace fraqk3jkobfy --prefix front-end/assets/ --src-dir ./dist/assets --content-type "image/*" --overwrite -
Alternatively, Use a Script:
To simplify the upload process, you can use the pre-defined script:./upload_to_bucket.sh
This script automates the upload of all necessary files and folders directly to your specified Object Storage bucket, ensuring the correct structure for hosting a static website. Make sure you’ve configured your OCI CLI session and environment variables before running the script.
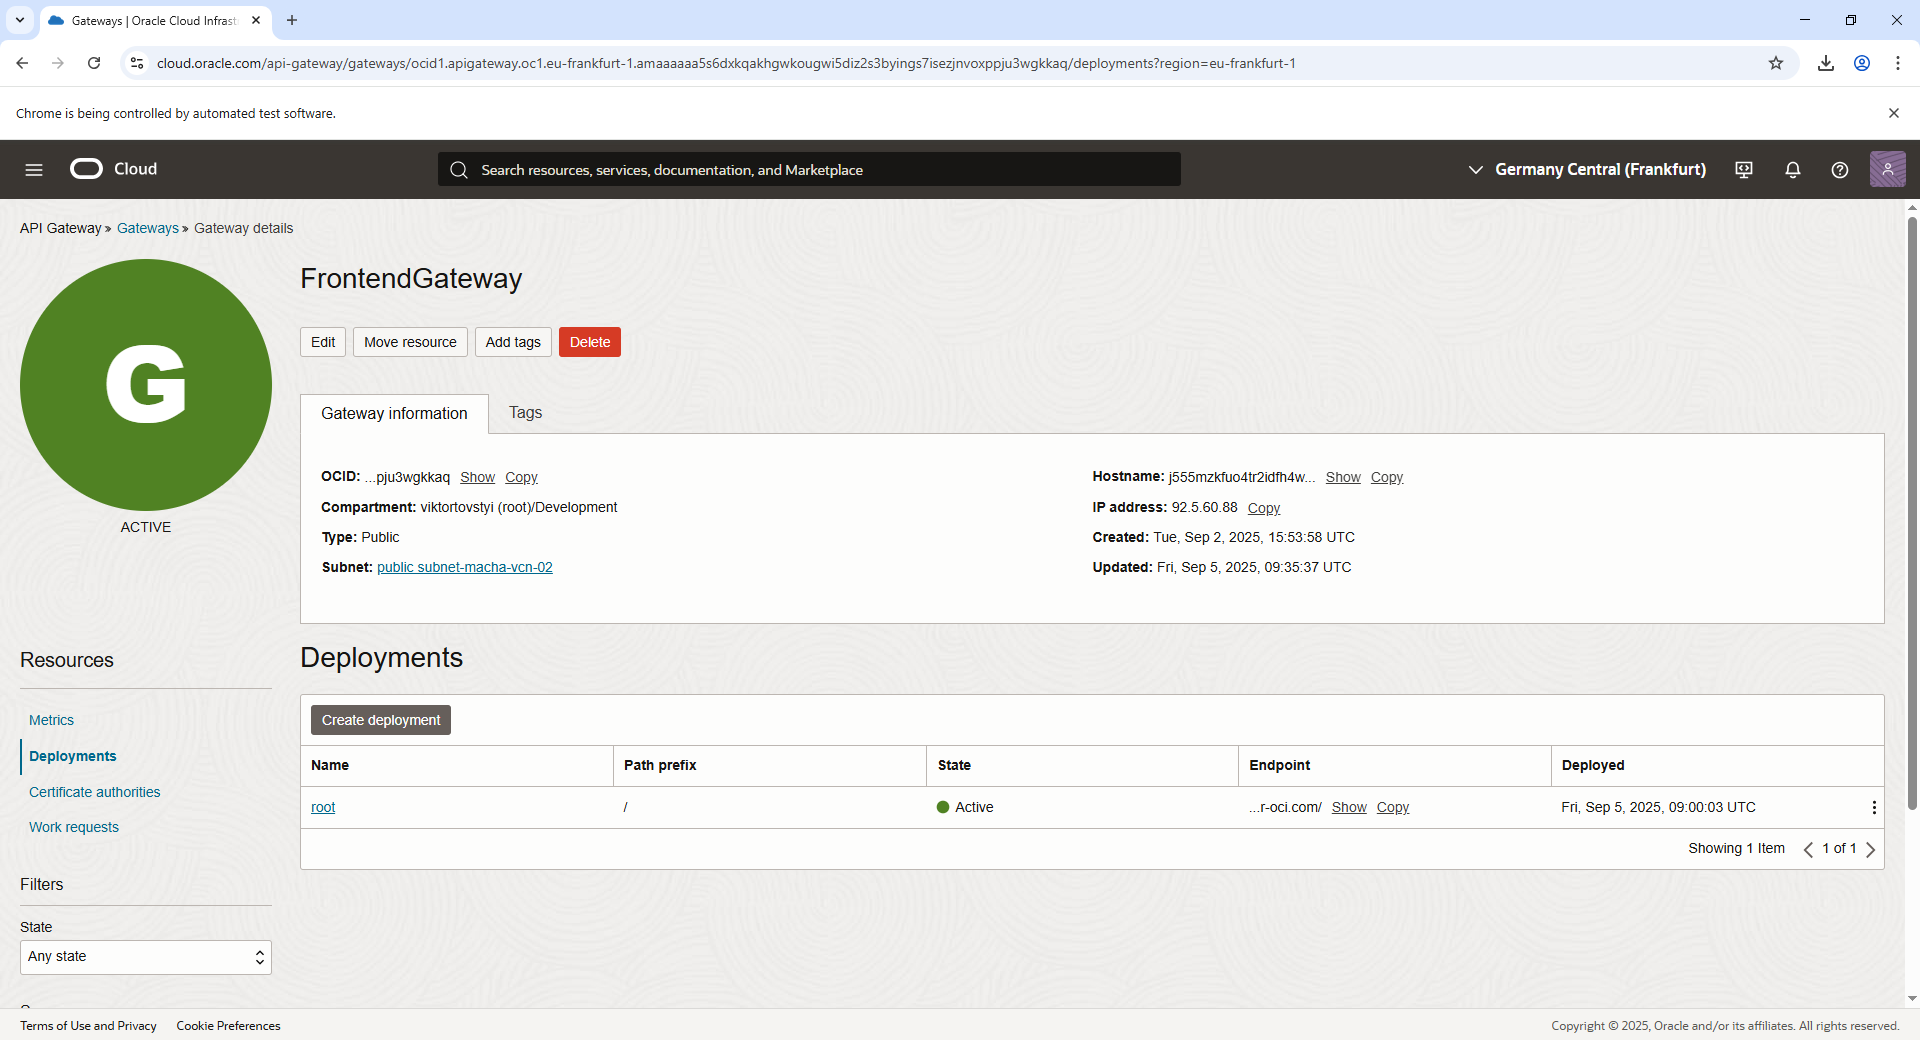
Create an Frontend Gateway
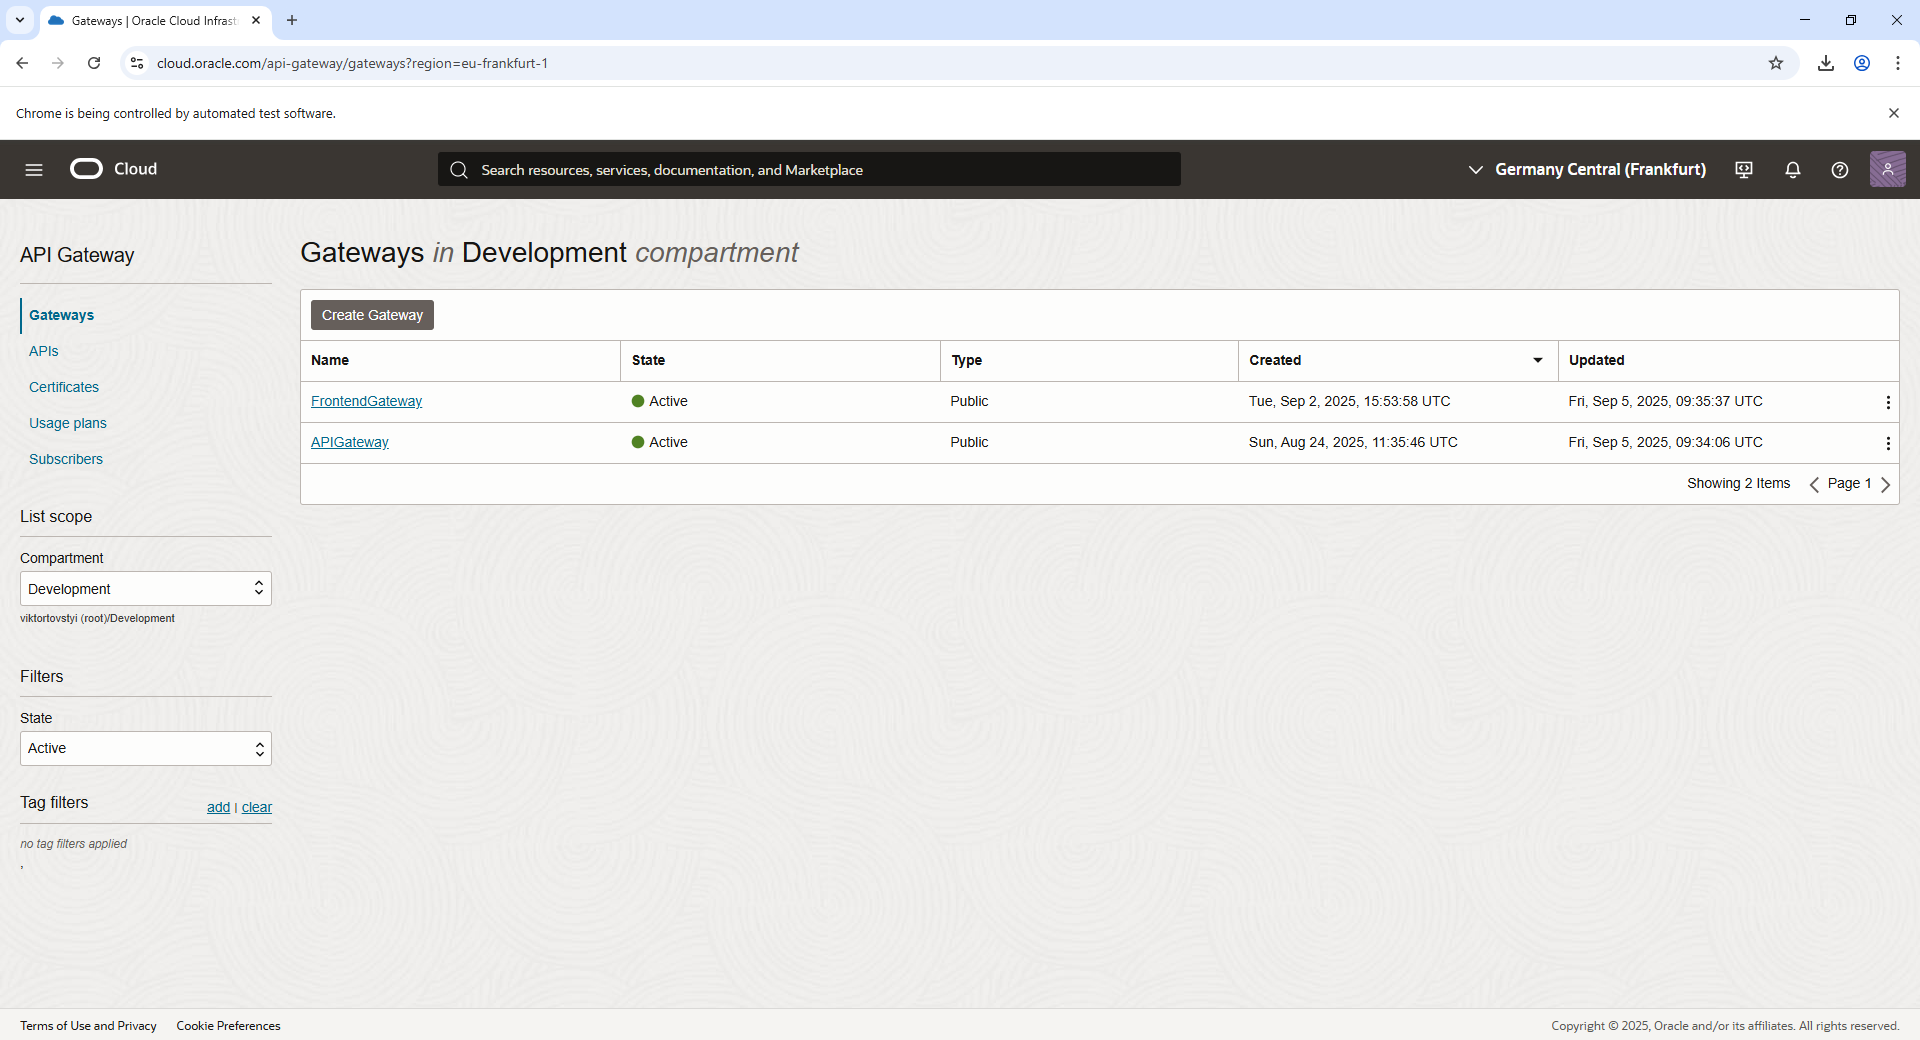
- Navigate to Developer Services > API Gateway in the OCI Console.
- Create a new API Gateway and attach it to a VCN.
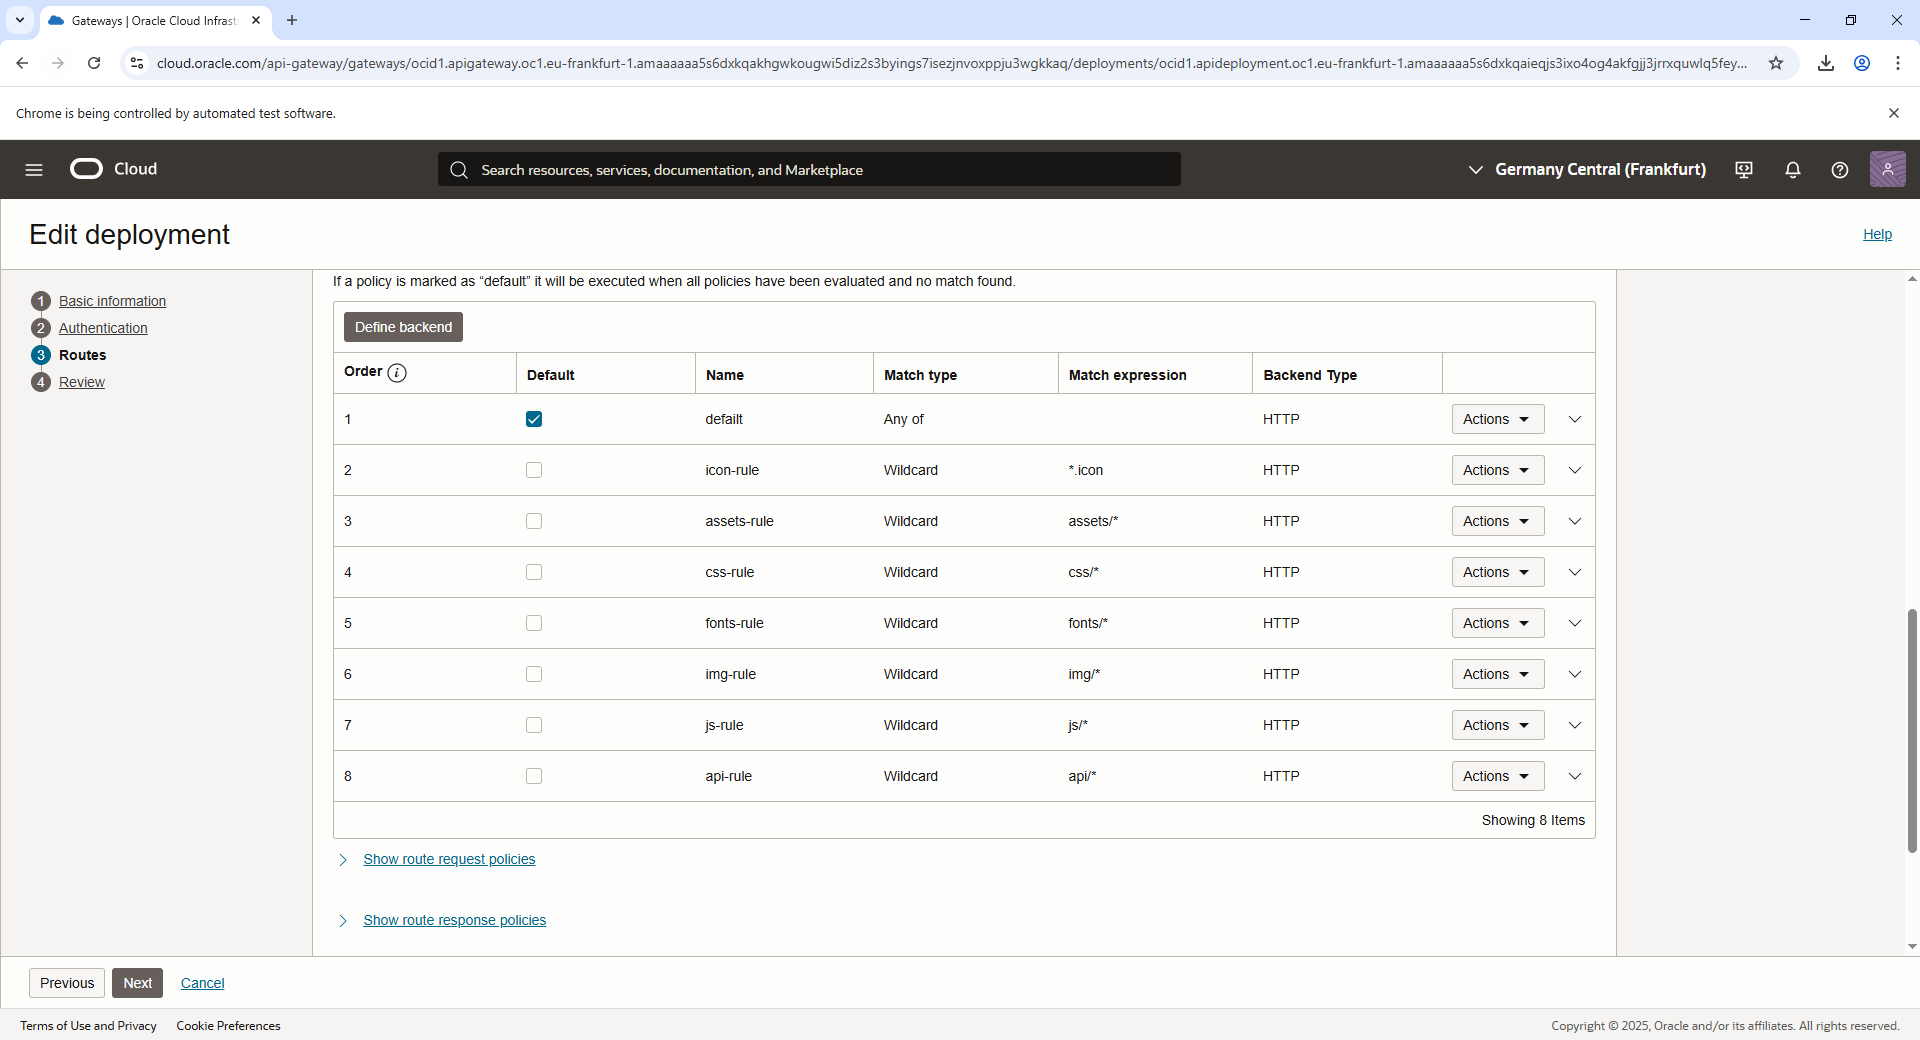
- Deploy an API route in the API Gateway to map requests (e.g.,
/index.html) to the Object Storage files.
Setting Up an Internet Gateway (IGW)
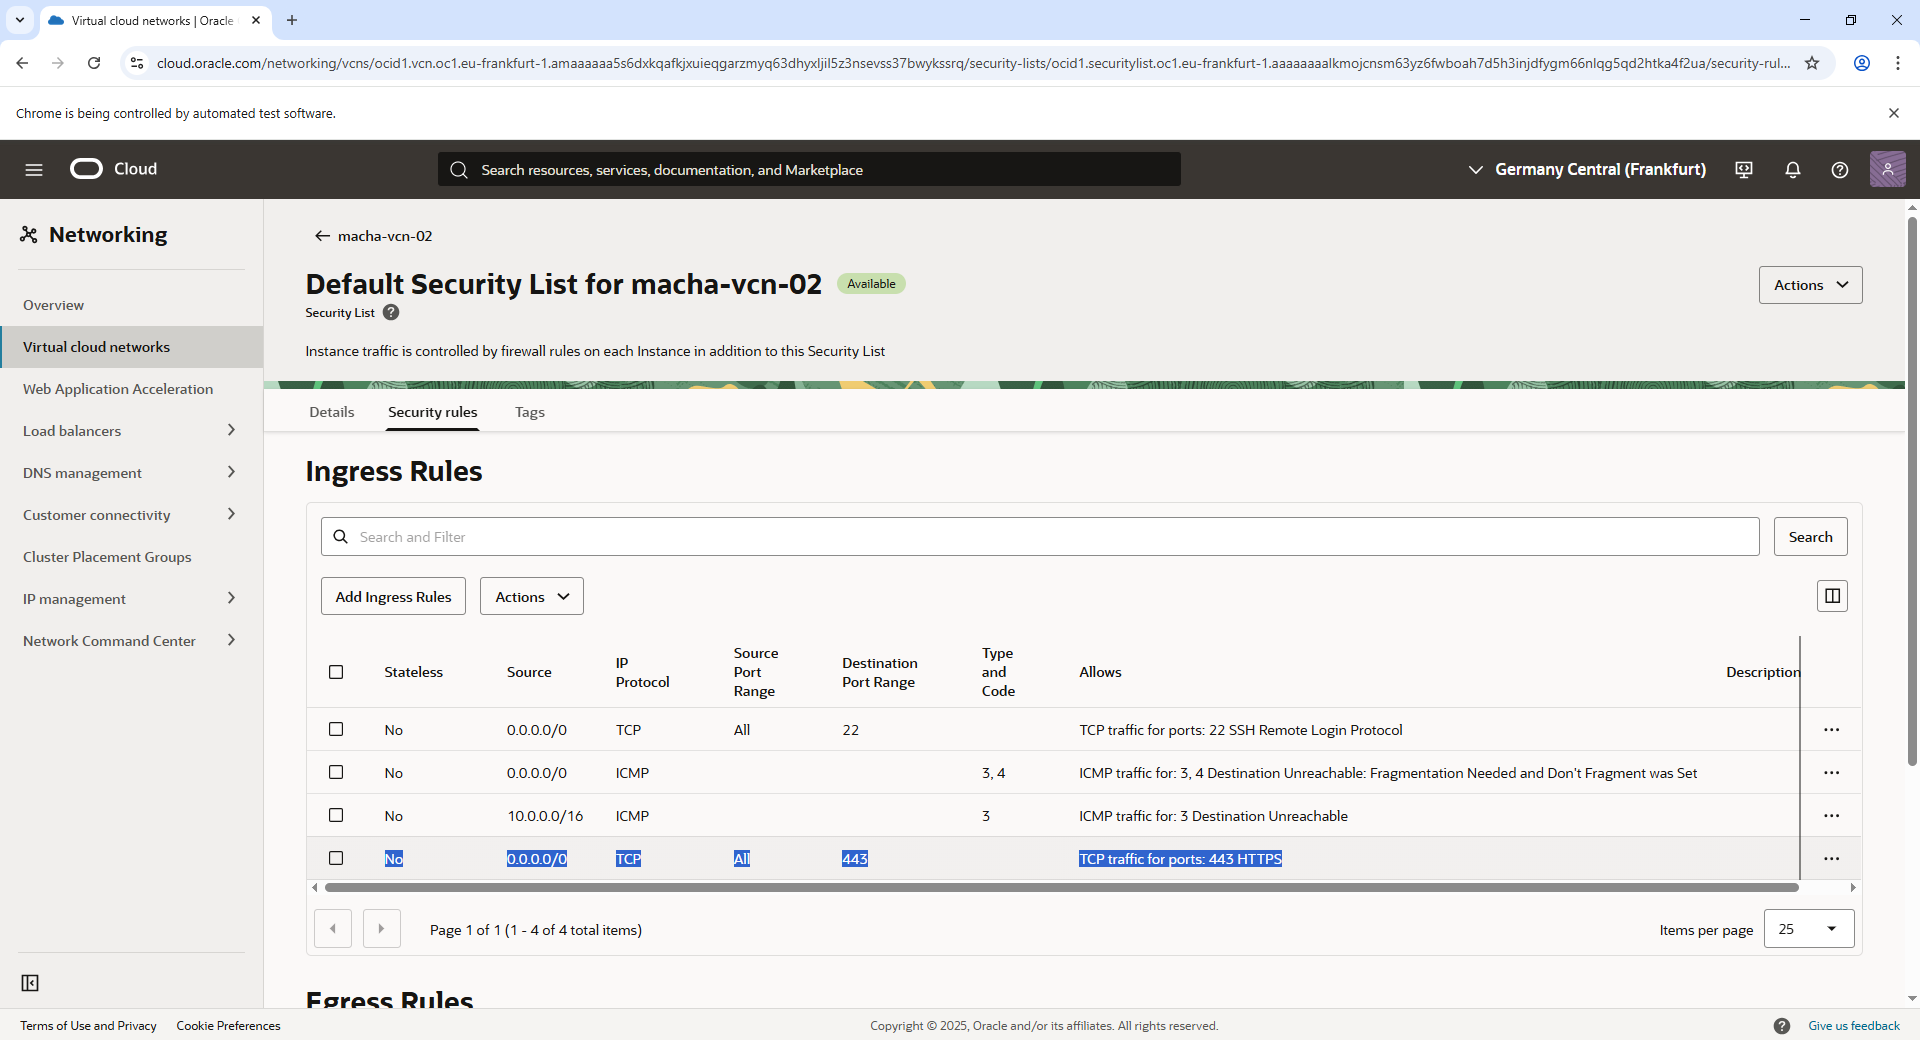
In Oracle Private Cloud Appliance, Internet Gateways (IGWs) allow Virtual Cloud Networks (VCNs) to communicate with external networks. To enable access from outside the VCN, you must configure an IGW and set up specific rules.
This process involves:
- Adding an ingress rule to the security list, allowing inbound HTTPS traffic on TCP port 443 for encrypted web server connections.
- Creating a route rule in the VCN route table (default or custom) directing internet-bound traffic (
0.0.0.0/0) to the IGW target.
Without appropriate ingress rules or route rules, inbound connections, including HTTPS requests, will not work. For more information, refer to the “Oracle Documentation on Internet Gateway Configuration”2
Configuring API Gateway
The following steps explain how to configure an API Gateway to invoke an OCI Function using the Oracle Cloud Infrastructure (OCI) Console. This configuration enables API Gateway to act as a front-end interface for your OCI Functions.
Create an API Gateway
- Log in to the OCI Console.
- Navigate to API Gateway.
- Click Create Gateway and provide the necessary details:
- Name: Specify a unique name for your gateway (e.g.,
APIGateway). - Compartment: Select the compartment in which the gateway will reside.
- Subnet: Attach the API Gateway to a subnet in the desired Virtual Cloud Network (VCN).
- Name: Specify a unique name for your gateway (e.g.,
- Click Create and wait for the API Gateway to be provisioned.

Create a Deployment
- Once the gateway is active, click on it to open the details page.
- Under Resources, navigate to Deployments ? Create Deployment.
- Choose the deployment type as “Create from Scratch”:
- Name: Name the deployment (e.g.,
api). - Path Prefix: Define the root path for the API (e.g.,
/api).
- Name: Name the deployment (e.g.,
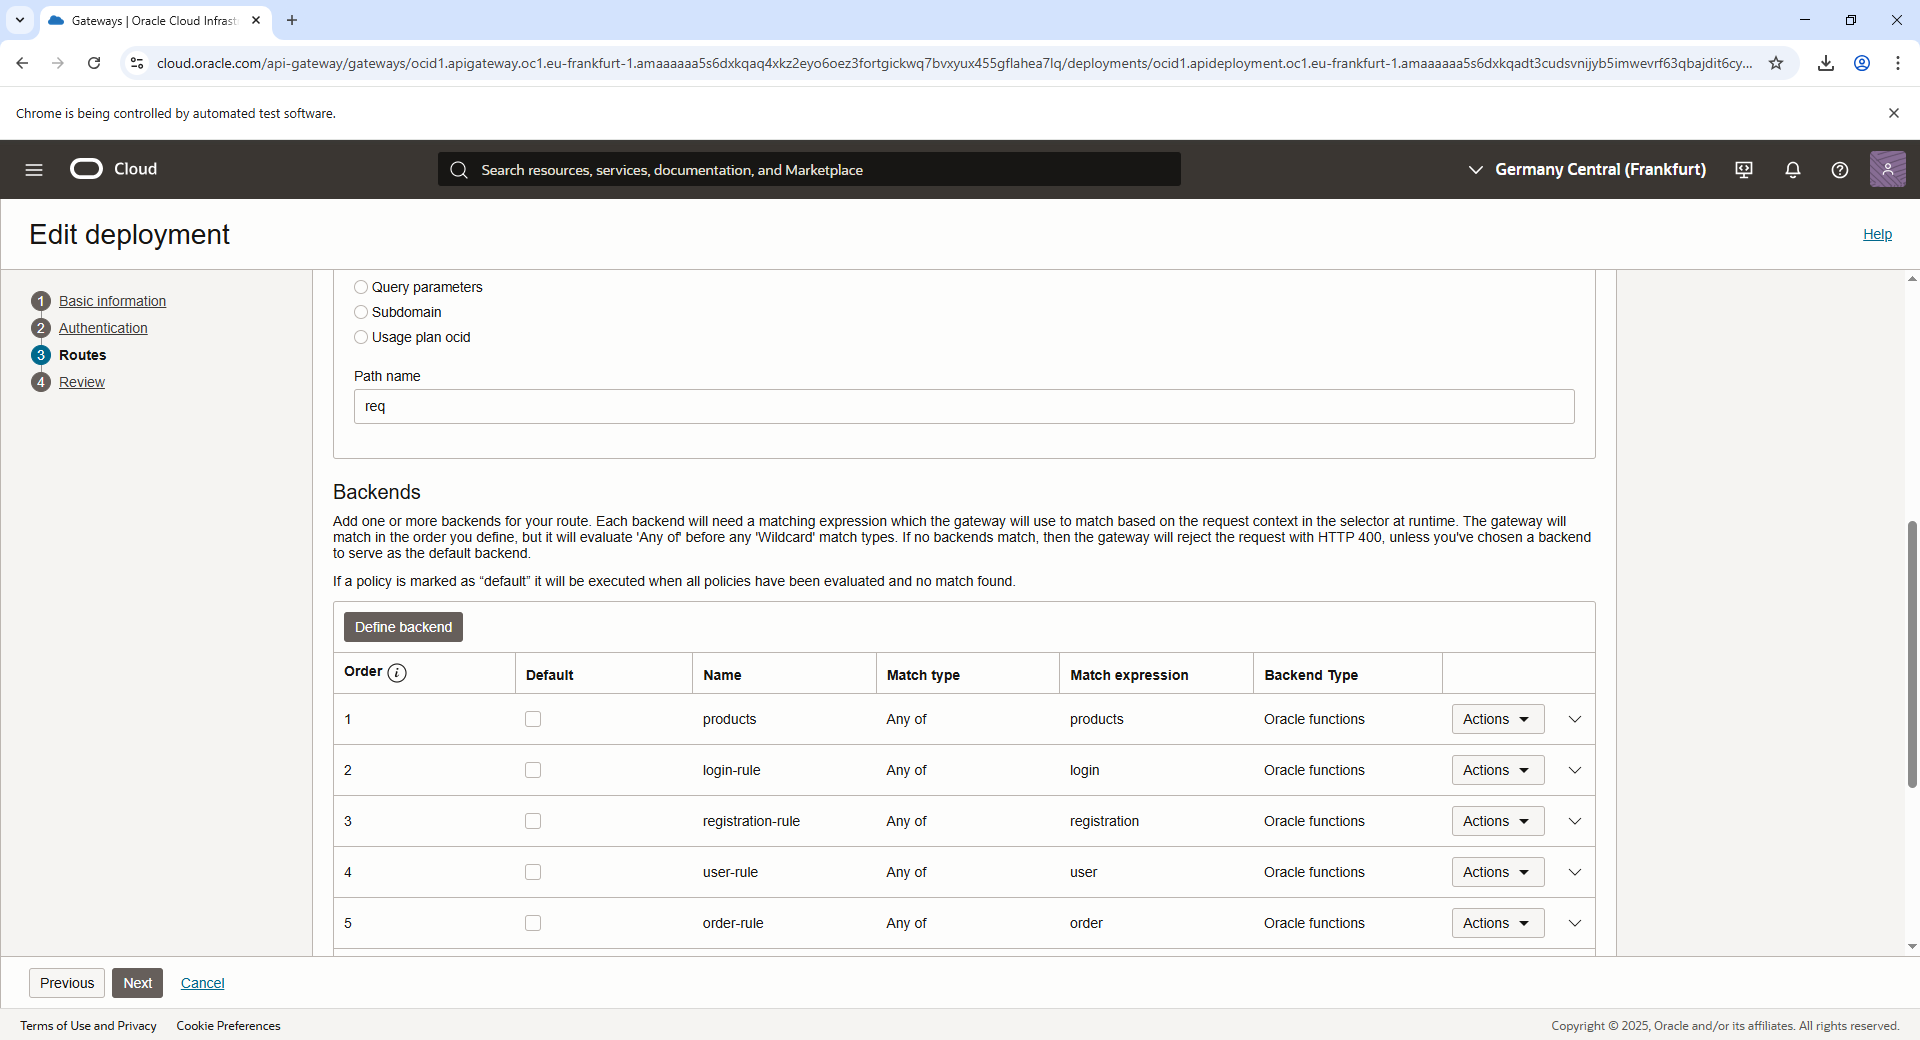
- Configure the Route to integrate with the OCI Function:
- Click Add Route and provide the following:
- Path: Specify a path for the function (e.g.,
/loginfor a login function). - Methods: Select supported methods (e.g.,
POST,GET). - Backend Type: Choose Oracle Functions.
- Function: Select the OCI Function by browsing the list or entering the Function OCID.
- Path: Specify a path for the function (e.g.,
- Click Add Route and provide the following:
Apply Policies for the Route
- Security Policies: Authorization: Use an Authorizer OCI Function to manage API calls authorization.
- CORS Policies (Optional): If your front-end is hosted on the same domain as the API Gateway, CORS may not be required. However, you can enable Cross-Origin Resource Sharing if there is a need to allow requests from other origins.

Grant API Gateway Access to OCI Functions
- Add an IAM policy to allow the API Gateway to invoke OCI Functions3:
ALLOW any-user to use functions-family in compartment <functions-compartment-name> where ALL {request.principal.type= 'ApiGateway', request.resource.compartment.id = '<api-gateway-compartment-OCID>'}
Example:
ALLOW any-user to use functions-family in compartment Development where ALL {request.principal.type= 'ApiGateway', request.resource.compartment.id = 'ocid1.compartment.oc1..aaaaaaaaq______________________________rhmh6lwt7nmka'}
Test
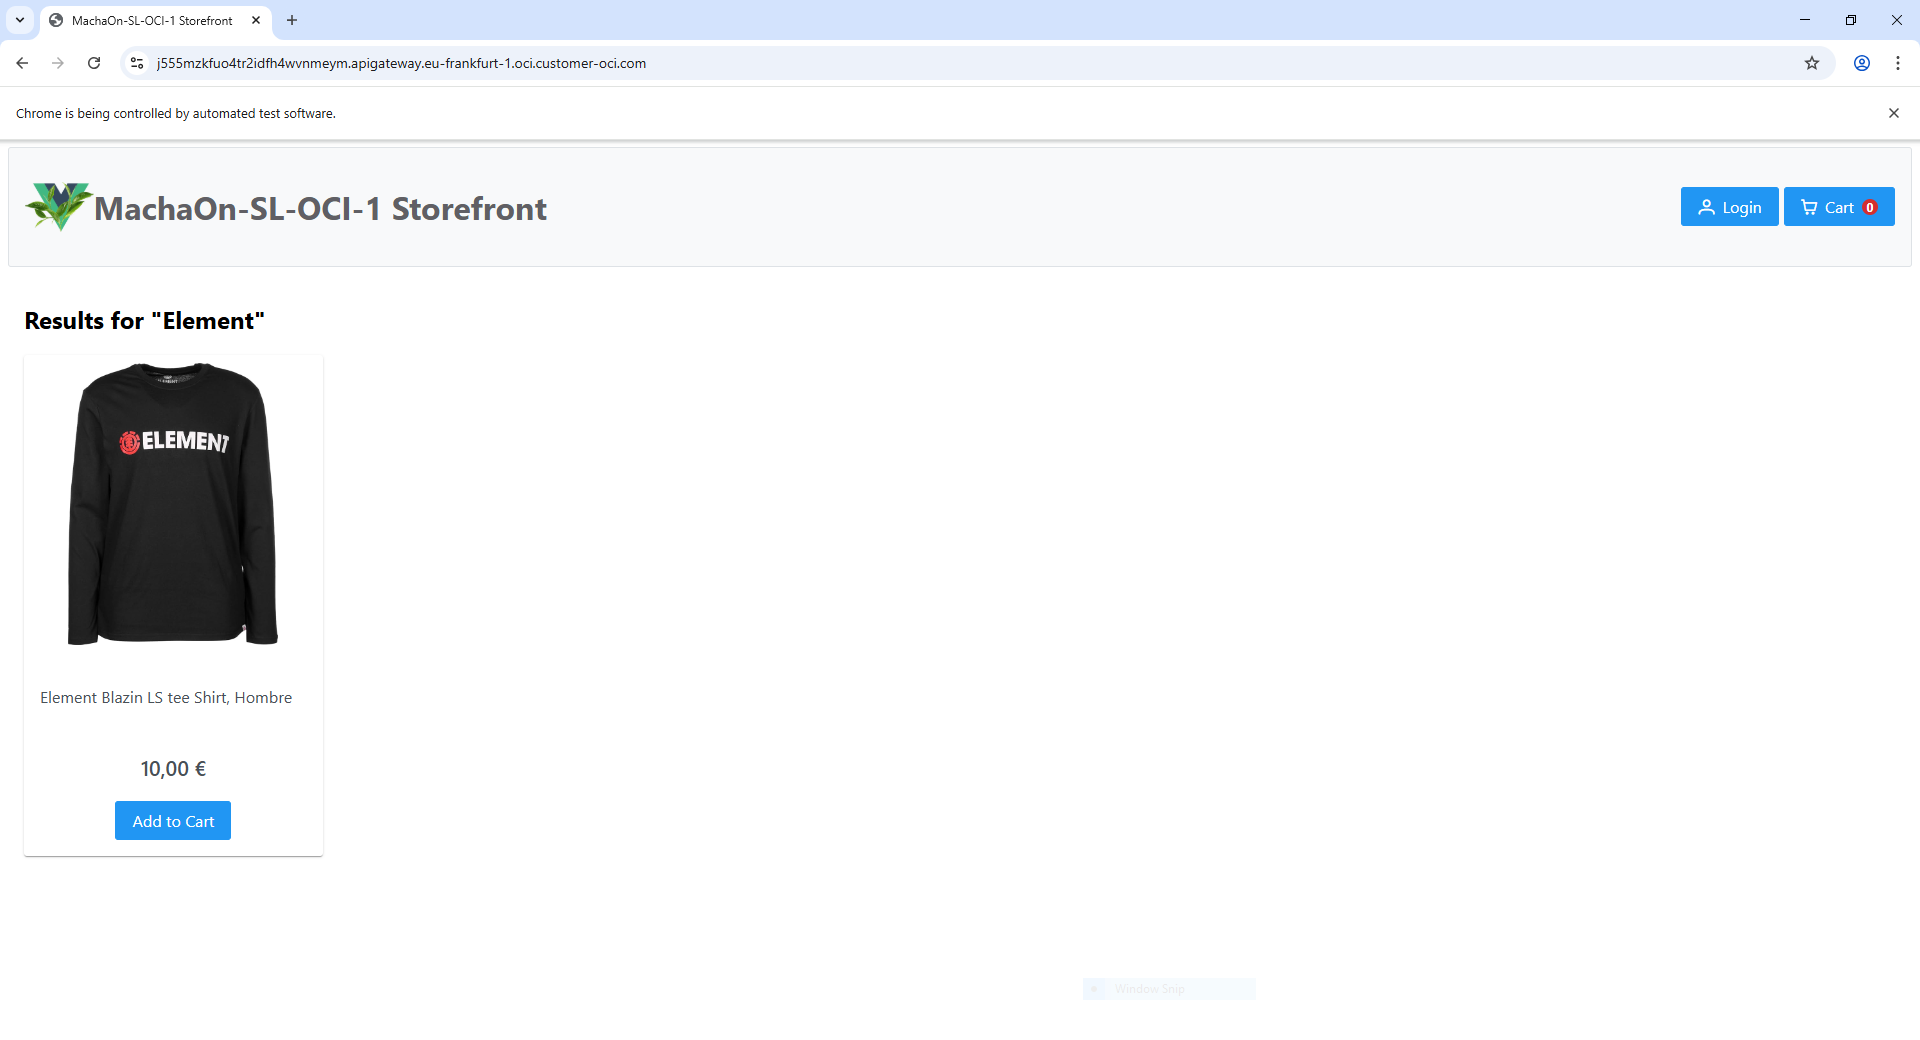
- Use the API Gateway's HTTPS endpoint URL to access or serve your website:
Example:
https://j555mzkfuo4tr2idfh4wvnmeym.apigateway.eu-frankfurt-1.oci.customer-oci.com/